Converting a Vagrant Box From VirtualBox Format To VMware Workstation or Fusion

Chocolatey recently released a new version of the Package Moderation Services sandbox, and it got me thinking. How can I use it in VMware Workstation?
I don’t use VirtualBox, but I wanted to use the box that they created. So, I decided to look into converting the Vagrant VirtualBox box for use in VMware Workstation and Fusion and thus, this guide was born!
Here Be Dragons!
Before we go any further there are a couple of things I need to clear up.
This guide can be used as a template for converting any Vagrant VirtualBox Vagrant box to a VMware Workstation or Fusion Vagrant box. As it is based on a very specific box, version 3.0.0 of the
chocolatey/test-environment, it uses specific names and filenames. If you convert another box, you will need to change those. I would hope that would be obvious, but just because it is to me doesn’t mean it is to anyone else.
While this guide focuses on converting a VirtualBox Vagrant box to a VMware Workstation or Fusion box, you can actually use it without Vagrant. You’ll need to pick your way through the guide and remove what you don’t need, but the majority of the steps are the same. It will not work with every VirtualBox box out there, and it will not work with any Windows Vagrant box that has been sysprep’d (unless you sysprep it again when you’re finished). In short, your mileage may vary.
This is a quick and dirty way to convert a Vagrant VirtualBox box to a VMware Workstation or Fusion box. It works. But that doesn’t mean it’s ideal or good practice. In fact, it’s not good practice. It’s bad practice. Don’t do it. The end disk image will likely be considerably larger than the original. The preferred way to get a Vagrant VMware Workstation or Fusion box is to build a VMware Workstation or Fusion virtual machine from scratch. Having said that, this does work as a temporary solution.
Finally, the Vagrant VirtualBox format is denoted by
virtualboxand the VMware Workstation or Fusion format is now denoted only byvmware_desktop.
Prep Work
The only tool you need installed for the conversion is VMware Workstation or Fusion. I will talk about VMware Workstation in this guide, but it equally applies to Fusion.
Storing The Virtual Machine
If you are going to keep using the converted box as a Vagrant box, then we need to determine where Vagrant stores the boxes. To determine that, run:
$vagrantData = `
  if (Test-Path -Path Env:/VAGRANT_HOME) { `
    $env:VAGRANT_HOME `
  } `
  else { `
    Join-Path -Path $HOME -ChildPath '.vagrant.d' `
  } `
$vagrantData
The Vagrant home path will be output. To create the folder structure, we need for the Vagrant box called my-chocolatey-test-environment, run:
# create the path to the destination box folder
$boxDest = Join-Path -Path $vagrantData `
  -ChildPath 'boxes/my-chocolatey-test-environment/0/vmware_desktop'
# create the directory tree
New-Item -Path $boxDest -ItemType Directory
Download VirtualBox Box
Download the latest Vagrant box version using vagrant box add chocolatey/test-environment --provider VirtualBox. If you want to download a specific box version, add --box-version <VERSION NUMBER> to the end of that command. The box is 7.43 GB so will take some time to download. Vagrant doesn’t always give you an estimate of how long it will actually take. Be patient.
vagrant box add chocolatey/test-environment --provider VirtualBox
==> box: Loading metadata for box 'chocolatey/test-environment'
    box: URL: https://vagrantcloud.com/chocolatey/test-environment
==> box: Adding box 'chocolatey/test-environment' (v3.0.0) for provider: VirtualBox
    box: Downloading: https://vagrantcloud.com/chocolatey/boxes/test-environment/versions/3.0.0/providers/VirtualBox.box
Progress: 1% (Rate: 5950k*/s, Estimated time remaining: 0:18:15)
Convert From virtualbox to vmware_desktop format
To convert the VirtualBox Vagrant box to VMware Workstation format, we need to run the VMware disk management tool, vmware-vdiskmanager:
PS> vmware-vdiskmanager -r `
  (Join-Path -Path $vagrantData `
  -ChildPath '/boxes/chocolatey-VAGRANTSLASH-test-environment/3.0.0/VirtualBox/chocolatey-test-environment-disk001.vmdk') `
  (Join-Path -Path $boxDest -ChildPath 'disk001.vmdk') -t 0
Note that on testing this, the end image was double the size, 15.6 GB, of the original.
VMware Workstation Virtual Machine Configuration
To automate this next step, I tried the
vmruncommand from thevagrant-vmware-utility. This has both aninstallTools(to install VMware Tools) andrunProgramInGuest(to uninstall VirtualBox tools) commands. TheinstallToolscommand just mounted the tools DVD in the virtual machine. I assume it expects the virtual machine operating system to auto-run thesetup.execommand from the DVD. This didn’t happen for thechocolatey/test-environment. TheinstallToolscommand eventually times out (after 5 to 10 minutes - I gave up counting). Unfortunately, you need the VMware tools installed in the virtual machine to userunProgramInGuestcommand. So you can’t uninstall the VirtualBox tools until you install the VMNware Tools which you can’t install as the setup doesn’t automatically run. All very frustrating. I mention this as it may be possible to do this on other boxes and if so, runC:\Program Files\Oracle\VirtualBox Guest Additions\uninst.exeto uninstall the VirtualBox tools. This hopefully saves you digging through the registry for the uninstall command!
This is a very manual part of the whole process. We need to remove the VirtualBox tools and install the VMware tools.
We need to temporarily add a VMware configuration file to allow us to run it in VMware Workstation. Create a text file
$boxDest/vmware.vmxwith the contents below. We will throw this away later when VMware Workstation will introduce changes to it, we don’t need.Now open that file in VMware Workstation or Fusion by going to File -> Open, and selecting the file
$boxDest/vmware.vmx. You will see it highlighted in the Library on the left, click Start up this guest operating system. Ignore the warnings about devices not being available.Once the virtual machine has started, we need to Install VMware Tools. In the VMware Workstation interface, go to VM -> Install VMware Tools and click the Install button on the next pop-up window.
For this virtual machine, the VMware Tools do not install automatically. In the virtual machine, open Windows Explorer, click the DVD Drive (D:) and double-click setup64.exe. Just click Next, Next, Install and then Finish. Click No when asked to restart. We’re not finished yet.
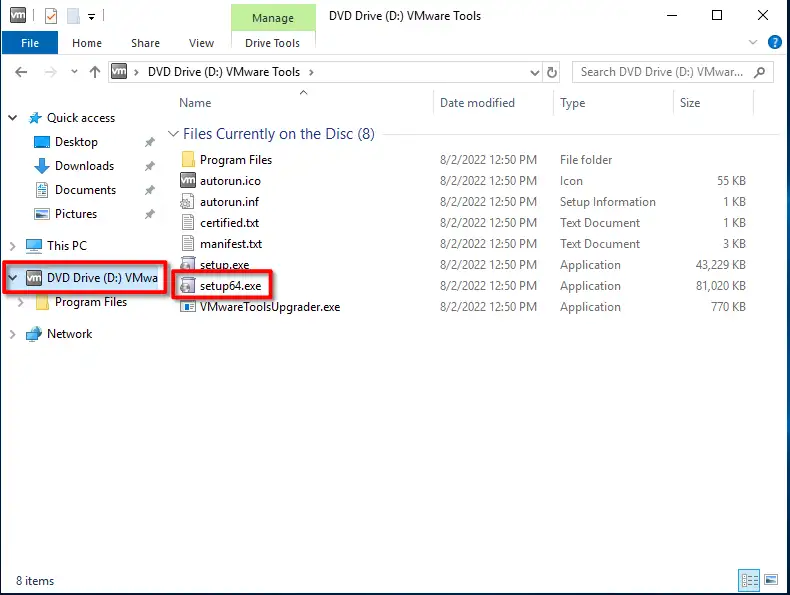
Install VMware Tools using setup64.exe.
Go to Control Panel -> Programs and Features. Uninstall
Oracle VM VirtualBox Guest Additions. Select Yes when asked to restart.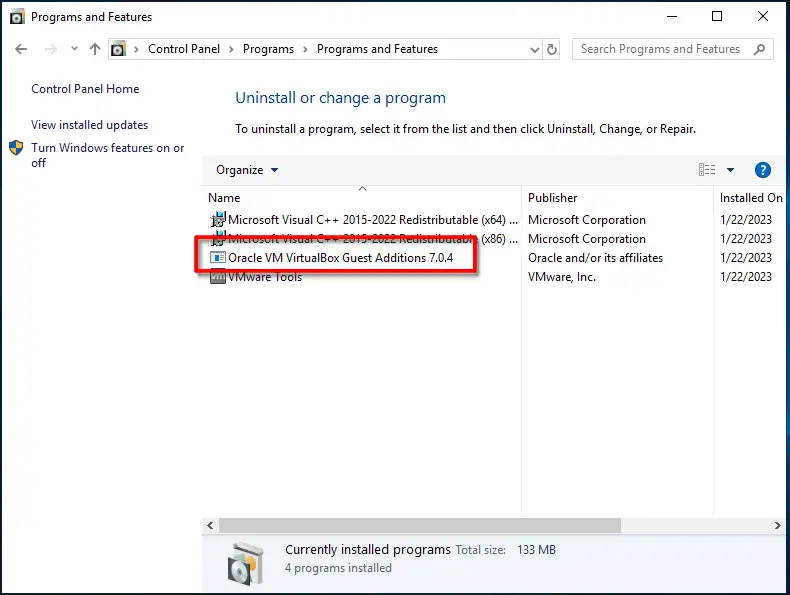
Uninstall VirtualBox Guest Additions.
We’re now finished with our changes. Shut down the virtual machine.
Remove the virtual machine from the VMware Workstation Library by right-clicking and selecting Remove and then Remove from Library. Do not select Delete from Disk!
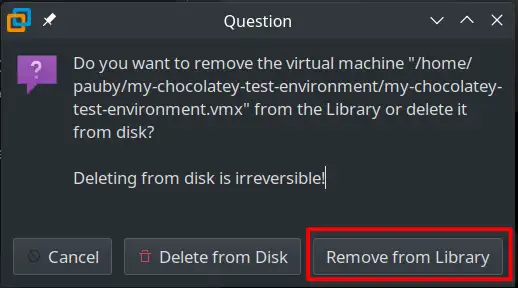
Remove the virtual machine from VMware Workstation Library. Do not select Delete from Disk!
Finishing The Vagrant Box
Now we have our VMware Workstation configured virtual machine, we just need to ensure it is ready to be a Vagrant box.
Go back to the folder we created earlier,
$boxDestand delete all the files in there except ourdisk001.vmdkfile.It’s best practice to shrink the disk. In my testing this made very little difference (it saved 13 MB) but you may get more benefit.
- Before we can shrink the disk, we need to defragment it by running
vmware-vdiskmanager -d (Join-Path -Path $boxDest -ChildPath 'disk001.vmdk'). - Once the defragmentation is complete, we can shrink the disk by running
vmware-vdiskmanager -k (Join-Path -Path $boxDest -ChildPath 'disk001.vmdk').
- Before we can shrink the disk, we need to defragment it by running
Like we did earlier, we need to create the VMware configuration text file
$boxDest/vmware.vmxwith the contents of this GitHub gist.Create a Vagrant configuration text file
$boxDest/metadata.jsonwith only a single line of text{"provider":"vmware_desktop"}.Let’s do a sanity check before we go further. In our
$boxDestfolder, there should be 3 files with the names below:metadata.jsondisk001.vmdkvmware.vmx
To see our new box, run
vagrant box list:PS> vagrant box list my-chocolatey-test-environment (vmware_desktop, 0)
Using The Converted Box With Vagrant
You now have a Vagrant box that is ready to use with the vmware_desktop provider. It’s time to try it. 1. We just need to tell Vagrant to use it by making some modifications to whatever Vagrantfile we use.
Find the line that defines the box and change it to
my-chocolatey-test-environment, like this:config.vm.box = "my-chocolatey-test-environment"Comment out any
box_versionline, like this:# config.vm.box_version = "3.0.0"Run
vagrant upand your new box,my-chocolatey-test-environmentshould start.Bringing machine 'default' up with 'vmware_desktop' provider... ==> default: Cloning VMware VM: 'my-chocolatey-test-environment'. This can take some time... ==> default: Verifying vmnet devices are healthy... ==> default: Preparing network adapters... ==> default: Starting the VMware VM... ==> default: Waiting for the VM to receive an address... ...
Summary
Looking at the Vagrant Cloud you can see there are many VirtualBox format boxes. There are fewer VMware boxes. Rather than creating your own, you now have the option of converting an existing box for use with VMware Workstation. Having said that, note the warnings above because it’s not the way you’d want to do it. But it is a way that works.
The manual steps to install VMware Tools and uninstall VirtualBox tools are unfortunate. I really wanted to automate that and end up with a script that did all of this. But it wasn’t to be for the chocolatey/test-environment box. Maybe you would have more luck with another box, and the instructions I provided above may help. If they need tweaked, please leave me a comment and I’ll get them updated.
I may do another post in future on how to convert a box to other Vagrant providers. Meanwhile, please let me know what you think of this post and if it was useful to you.
