How To Create A Single OpenVPN Client Configuration For The GL.iNet Router

In the previous post I talked about how to set up the GL.iNet AR300M router to connect to hotel WiFi and be used as a hotspot. While having all of your devices behind a NAT router enhances their security on public WiFi, what are the options if you want to encrypt that outbound connection?
The GL.iNet routers support two different types of encrypted connection:
- OpenVPN (client and server);
- WireGuard (client and server);
In this post I’ll be focusing on setting up the router as an OpenVPN client that will connect to an OpenVPN server and provide an encrypted connection for all your connected devices.
Quirks and idiosyncrasies
Image courtesy of John C Bullas
Creating a VPN connection on the router is not as simple as uploading your .ovpn file. Well it may be. For you. Be it wasn’t for me and I’d guess the majority of other people. So you need to bear these two points in mind:
- You know those OpenVPN configuration files that your VPN provider had you download? Well the GL.iNet router can’t use all of them. It needs one configuration file. That’s the purpose of this blog post;
- If the password you use for your OpenVPN server has a space in it then you’re going to need to change it. As of version 3.024 of the firmware, the GL.iNet router doesn’t support spaces in OpenVPN passwords.
Create a single OpenVPN client configuration file
I have two OpenVPN client configuration I’m going to cover:
- IPVanish;
- My OpenVPN server - yes I run my own OpenVPN server via pfSense;
While I’m talking about pfSense OpenVPN server specifically in this blog post it’s the files themselves that are important.
IPVanish VPN
You can download the OpenVPN configuration files from the IPVanish website. Note that IPVanish change their servers frequently. We’ll use Amsterdam ams-a01 server as our example but you may need to adapt these instructions, but you will end up with two important files:
ipvanish-NL-Amsterdam-ams-a01.ovpn- this is the Amsterdam a01 server OpenVPN configuration file;ca.ipvanish.com.crt- this is the IPVanish certificate;
To actually get this all into one file is really straightforward. In the ipvanish-NL-Amsterdam-ams-a01.ovpn file:
- Remove the line
ca ca.ipvanish.com.crtwhich tells the configuration to read that file for the certificate; - Add a
<ca>and</ca>and between them copy the contents of the fileca.ipvanish.com.crtfile.
So you should end up with something that looks like this:
client
dev tun
proto udp
remote ams-a01.ipvanish.com 443
resolv-retry infinite
nobind
persist-key
persist-tun
persist-remote-ip
verify-x509-name ams-a01.ipvanish.com name
cipher AES-256-CBC
auth SHA256
auth-user-pass
comp-lzo
verb 3
keysize 256
tls-cipher TLS-DHE-RSA-WITH-AES-256-CBC-SHA:TLS-DHE-DSS-WITH-AES-256-CBC-SHA:TLS-RSA-WITH-AES-256-CBC-SHA
<ca>
-----BEGIN CERTIFICATE-----
... lots of random text and numbers ...
-----END CERTIFICATE-----
</ca>
pfSense OpenVPN Server
This is slightly trickier as there are more files in this configuration:
pauby vpn.ovpnrouter-pauby-tls.keyrouter-pauby.p12
The first two are text files. The third, router-pauby.p12, is a binary file that will need to be converted to text for us to use.
Converting binary PKCS#12 or PFX files to text
The router-pauby.p12file is a Public Key Cryptography Standards (PKCS) archive file. This file format can be used to store different types of cryptography objects which allows certificates, keys etc. to be distributed in one file. In our case it is storing the server certificate, any intermediate certificates and the private key. We need to use OpenSSL to convert this file from binary to text.
Before we start you will need the openssl utilities on your computer:
- Install with Chocolatey -
choco install openssl.light; - Download the Windows version from Shining Light Productions and install manually;
Once openssl is installed, run the following command (you can find out what all those switches mean by running openssl pkcs12 -help):
# if prompted for an import password, simply press Enter
$ openssl pkcs12 -in router-pauby.p12 -info -nodes -out converted-p12.txt
This will give you a text file converted-p12.txt that will have the certificates and key that we need.
Identifying the keys and certificates we need
If you have a look at the converted-p12.txt file we created in the last section you will likely have 3 sections:
- One
-----BEGIN PRIVATE KEY-----section; - Two
-----BEGIN CERTIFICATE-----sections;
If you have more than this you may have one or more intermediate certificates. I don’t have these but they will likely be whatever is left over after you identify the ones below.
The first one is easy as the section name tells you what it’s for. When copying and pasting the key make sure to copy the contents between, and including, -----BEGIN PRIVATE KEY----- and -----END PRIVATE KEY-----.
The second one is a little trickier as we are left needing a public key and a Certificate Authority (CA) certificate. But which one is which? We use the CN of the subject key to identify each certificate.
The public key will have a subject similar to the one below:
subject=C = Tatooine, ST = Great Mesra Plateau, L = Mos Eisley, O = Pauby, emailAddress = [email protected], CN = pauby
The CN identifies this as the public key, as it includes our name.
The Certificate Authority (CA) certificate will have a subject similar to the one below:
subject=C = Tatooine, ST = Great Mesra Plateau, L = Mos Eisley, O = Pauby, emailAddress = [email protected], CN = VPN Server
The CN identifies this as the CA certificate as it doesn’t have our name in there.
When copying and pasting any of these keys or certificates make sure to copy the contents between, and including the -----BEGIN... and -----END... lines. Those lines are important.
So at the end we have identified what is the private key, the public key and the CA certificate.
Putting it all together …
To start with, the pauby vpn.ovpn configuration file looks like this:
dev tun
persist-tun
persist-key
cipher AES-256-CBC
auth SHA1
tls-client
client
resolv-retry infinite
remote dummy.server.com 443 tcp
lport 0
verify-x509-name "pauby VPN" name
auth-user-pass
pkcs12 router-pauby.p12
tls-auth router-pauby-tls.key 1
ns-cert-type server
Open the pauby vpn.ovpn file and lets go through this step-by-step:
Remove the lines that refer to the other files as we are going to embed them - but note the number at the end of the
tls-authstatement:pkcs12 router-pauby.p12 tls-auth router-pauby-tls.key 1Add
<tls-auth>and</tls-auth>and between them copy the contents ofrouter-pauby-tls.key. The end result will be something like this:<tls-auth> -----BEGIN OpenVPN Static key V1----- ... lots of random text and numbers ... -----END OpenVPN Static key V1----- </tls-auth>On a new line after the closing
</tls-auth>tag, addkey-direction 1(the number will be whatever is at the end of the originaltls-authstatement above). The result will be something like this:</tls-auth> key-direction 1Add
<key>and</keyand between them copy the private key we previously identified. You’ll end up with something like this:<key> -----BEGIN PRIVATE KEY----- ... lots of random text and numbers ... -----END PRIVATE KEY----- </key>Add
<cert>and</cert>and between them copy the public key we identified previously. You’ll end up with something like this:<cert> -----BEGIN CERTIFICATE----- ... lots of random text and numbers ... -----END CERTIFICATE----- </cert>Add
caand</ca>and between them copy the CA certificate. The result will be something like this:<ca> -----BEGIN CERTIFICATE----- ... lots of random text and numbers ... -----END CERTIFICATE----- </ca>
So we should end up with a single configuration file containing everything we need:
dev tun
persist-tun
persist-key
cipher AES-256-CBC
auth SHA1
tls-client
client
resolv-retry infinite
remote dummy.server.com 443 tcp
lport 0
verify-x509-name "pauby VPN" name
auth-user-pass
ns-cert-type server
<tls-auth>
-----BEGIN OpenVPN Static key V1-----
... lots of random text and numbers ...
-----END OpenVPN Static key V1-----
</tls-auth>
key-direction 1
<key>
-----BEGIN PRIVATE KEY-----
... lots of random text and numbers ...
-----END PRIVATE KEY-----
</key>
<cert>
-----BEGIN CERTIFICATE-----
... lots of random text and numbers ...
-----END CERTIFICATE-----
</cert>
<ca>
-----BEGIN CERTIFICATE-----
... lots of random text and numbers ...
-----END CERTIFICATE-----
</ca>
Configuring GL.iNet as an OpenVPN client
So now we have our single configuration file, we can configure our router:
Connect to the GL.iNet admin panel. I had to connect to
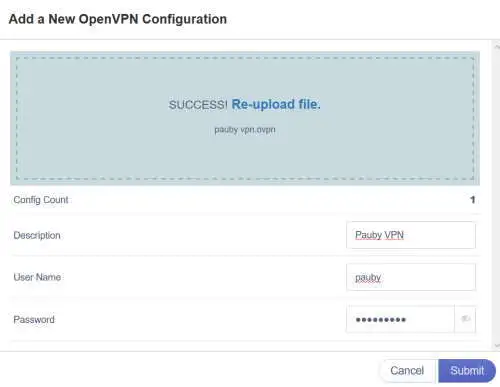
http://192.168.8.1and enter the admin password;Go to VPN and then Open VPN Client, click the Management tab and then the + Add a New OpenVPN Configuration;
Either drag and drop or select the single configuration file we created above and then:
- Enter a description;
- Enter the username you would use to connect to your OpenVPN server;
- Enter the password you would use to connect to your OpenVPN server. Note what I said above - can’t currently have spaces in the password. If you do it will fail to authenticate;
- Click Submit
That’s it.
If your configuration isn’t correct you won’t get any errors when uploading. The first time you’ll know is when you try to connect:
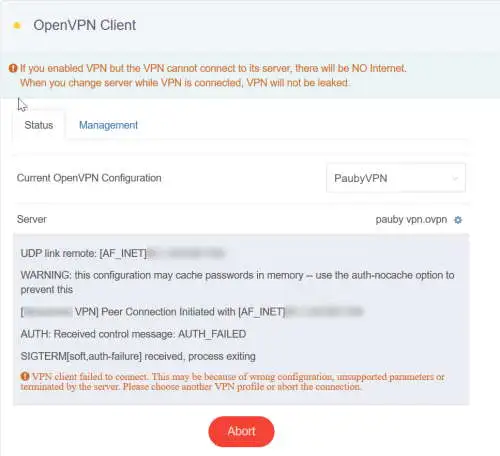
If the connection fails, the router won’t terminate it and continue routing traffic. It will stop until you do something.
It will also try to auto-connect when it starts to the last VPN connection you made. I had highlighted this in my previous post but it’s worth reiterating again here as I find it a real annoyance and a distraction when you are working on a new connection and nothing appears to be working.
Connecting to a VPN
So you have your VPN set up. But how do you connect?
Connect to the GL.iNet admin panel. I had to connect to
http://192.168.8.1and enter the admin password;Go to VPN and then Open VPN Client, click the Status tab, select the VPN to connect to in the Current OpenVPN Configuration selection box and click Connect;

Summary
If you have separate OpenVPN server configuration files, like mine, getting it all together into one file is not an easy task the first time. There is no one place to go to find out how to put everything together. I want to save others the pain I had to go through.
Once the router has your single configuration file, using a VPN connection for all your connected devices is easy. And that is the thing about this router. Quirky and difficult to work with though it is. Once you get everything working, it is pretty rock solid. On that one thing I simply can’t fault it.
