The WireGuard Struggle: A Linux User's Journey from OpenVPN

As a frequent traveller, I’ve connected to more hotel Wi-Fi networks than I can count. While these networks claim to be “guest-only”, they’re essentially public battlegrounds for security. After years of relying on OpenVPN to keep my data safe, I decided to try the much-hyped WireGuard. What should have been a simple upgrade turned into hours of frustration. Here’s what I learned.
Why WireGuard?
I’ve been using OpenVPN for years - it’s the veteran of VPN protocols, powering countless VPN services for over two decades. It’s battle-tested and reliable, but it can be slow and resource-intensive.
WireGuard promises a better way:
- Performance: More efficient network usage means faster connections.
- Security: A smaller codebase (~4,000 lines vs OpenVPN’s ~60,000) reduces attack surface and potential vulnerabilities.
- Simplicity: Designed to be easier to configure and maintain.
The key difference? While OpenVPN creates a traditional client-server connection, WireGuard establishes lightweight encrypted tunnels between peers. In theory, this should make setup straightforward. In practice… well, that’s where my troubles began.
My Setup and Approach
I’m running Fedora 42 (recently upgraded from 41), and I deliberately choose to use the GUI whenever possible. Why? As someone who spent years on the command line, I want to experience Linux the way newcomers do. If Linux is truly user-friendly in 2025, basic VPN setup shouldn’t require terminal wizardry.
Typical WireGuard Configuration
Below is a typical WireGuard configuration file with sensitive information redacted:
[Interface]
PrivateKey = <PRIVATE KEY>
Address = <IP ADDRESS>/32
DNS = <DNS IP 1>, <DNS IP 2>

[Peer]
PublicKey = <PUBLIC KEY>
AllowedIPs = 0.0.0.0/0
Endpoint = <ENDPOINT IP>:51820
This simple configuration is all WireGuard needs. No complex certificates or authentication methods. This simplicity should translate to easy GUI setup, right? Wrong.
Importing the WireGuard Configuration
Before you can use WireGuard in NetworkManager, you need to have the wireguard-tools package installed. This package will be different if you are not using Fedora, but in Fedora, you install this with:
$ sudo dnf install wireguard-tools
You may need to reboot, or you may need to restart NetworkManager using sudo systemctl restart NetworkManager (it was some time ago I installed this from scratch, so I can’t remember).
My next step was to import the WireGuard configuration file from my VPN provider. That seems logical as the option is there to allow that.

This feels like the right place to import a WireGuard configuration, right?
But that’s only for OpenVPN configurations. Who knew?

Error importing WireGuard configuration file.
Manually Adding the WireGuard Configuration
If the WireGuard connection doesn’t import, then the logical step is to enter the details manually. And this is where the time sink began.
Entering the details went without a hitch once I understood where they were. Peers was a button on the WireGuard Interface page and there is not a Gateway to enter into the IPv4 page, but once I got them all entered, the connection appears in the Networking icon on the System Panel. You select it and bang. No internet. Name resolution didn’t work. That cost me an hour or so trying to play around with DNS settings. Then I fell back to pings, which I should have done right away, but I got caught up in it always being a DNS issue.

Image courtesy of Vivek Gite.
But it wasn’t a DNS issue this time. As I couldn’t ping anything either.
Cue the movie montage of me spending literally hours trying different combinations of WireGuard options and settings, firewall ports and configurations, different networks (hotel WiFi, other WiFi, phone tethering, other phone tethering) but nothing worked.
Discovery: The wg-quick Test
I came across a forum post, which I’ve now lost, that lead the poster down the path of using the wg-quick tool. This tool takes a WireGuard configuration on the command line, and brings the tunnel up. Using that actually worked! So the configuration file is good. It’s NetworkManager that’s the problem.
This led me down a rabbit hole of post-up and dispatcher scripts, which is when I quickly jumped out. Surely you don’t need to resort to the command line, and some esoteric scripts just to get a WireGuard connection up and running? It’s been in the Linux kernel since 5.6 which was released in March 2020.
The Solution That Actually Works
The last step in my journey was this page and specifically, this command:
Finally, import the interface profile into NetworkManager. As a result, the WireGuard interface will persist after reboots.
# nmcli con import type wireguard file /etc/wireguard/wg0.conf

Connection 'wg0' (21d939af-9e55-4df2-bacf-a13a4a488377) successfully added.
With nothing left to lose I imported the WireGuard configuration with this command. And. It. Worked!
Not only could I ping IP addresses, I could browse the internet too. I checked the external IP address and sure enough, it was correct!
I tried two other WireGuard tunnels to different countries. All of them imported as they should. All of them allowed internet traffic to flow!
I had cracked it!
The fact that nmcli can import the exact same configuration that NetworkManager’s GUI rejects suggests the GUI is missing crucial import logic - likely related to route creation or interface management.
One More GUI Attempt
I wasn’t satisfied with the command line solution as it is not friendly, and it shouldn’t be necessary. Dropping to the command line to import a file so that it’s configuration is exposed in a GUI makes little sense to me.
There is a tool nm-connection-editor that provides a NetworkManager lookalike interface. It still doesn’t allow you to import the configuration.
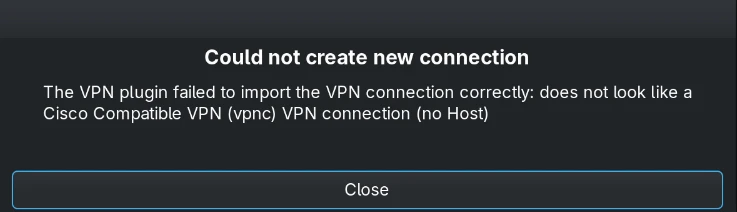
This one only lets you import a Cisco compatible VPN configuration 🤦♂️
But you can enter the configuration details manually. And in contrast to entering those same details in NetworkManager, this one works.
The Bottom Line
WireGuard’s promise of simplicity remains unfulfilled in the Linux GUI world. While the protocol itself is fast and simple, the NetworkManager implementation has critical gaps that force users to the command line.
For those facing similar issues:
- Don’t waste time with GUI imports - use
nmcli con import type wireguard file <PATH TO /CONFIG/FILE>. - If manual configuration is necessary, use
nm-connection-editorinstead of NetworkManager. - Keep
wg-quickas a debugging tool to verify your configuration works.
The Linux community needs to address this disconnect between WireGuard’s technical elegance and its user experience. Until then, we’re stuck with workarounds that defeat the purpose of having a GUI in the first place.
Was It Worth It?
Despite the setup headaches, WireGuard delivers on its performance promises. My connection speeds increased by roughly 30%, and the connection feels more responsive - especially noticeable on hotel Wi-Fi.
