How to get the best experience from Windows guests under Linux KVM

I’ve been using KVM for virtualization after making the leap from Windows to Linux over 18 months ago. Like most hypervisors, virtual machines under KVM need to be configured to run at their best. Let look at how to get the best from Windows Operating System guests under Linux KVM.
After the move away from Windows as my primary operating system, to Linux, back in October 2023, I’ve persevered with VMware Workstation 17 for a while. As I started to run into more and more problems, something had to be done. I wanted to try native Linux virtualization and I installed the KVM tools, and started using Virtual Machine Manager for management.
All hypervisor’s have one thing in common: the guests need to be configured to communicate with the host.
Below are the steps I go through when creating a Windows virtual machine. Several of the steps apply to whatever hypervisor I am using. Others are KVM specific, managed through Virtual Machine Manager.
You Do Know You’re Saying KVM, But You Really Mean … ?
I know I am simplifying Linux virtualization when I lump everything under ‘KVM’. It’s intentional. If I talk about KVM, QEMU, Xen, Proxmox, libvirt, virtio and others, I’ll be technically correct. But I’ll be confusing people unnecessarily. Wikipedia has a simple explanation:
Kernel-based Virtual Machine (KVM) is a free and open-source virtualization module in the Linux kernel that allows the kernel to function as a hypervisor.
In most cases this is appropriate and cuts down confusion. So I talk about KVM. If you want to be more specific, you do you.
Configure Your Windows Guests, Step-by-Step
My reference Obsidian note on ‘How to Set Up a Windows Guest under Linux KVM’ has these steps:
- Disable the NIC.
- Ensure the virtual machine has a CDROM device.
- Start the virtual machine.
- Mount
virt-win.isoon the CDROM, install the Virtio tools, and dismount the ISO. - Set Windows Updates to notify only.
- Enable the NIC.
- Enable file sharing between the guest and host.
- Shutdown and snapshot.
All the steps will use Virtual Machine Manager and assume that you have the virtual machine configuration open, and the virtual machine not running at the start.
Disable the NIC
In the virtual machine hardware details, make sure the NIC Link state is not ticked. This will stop Windows Updates from immediately detecting and downloading needed updates as soon as the virtual machine starts.
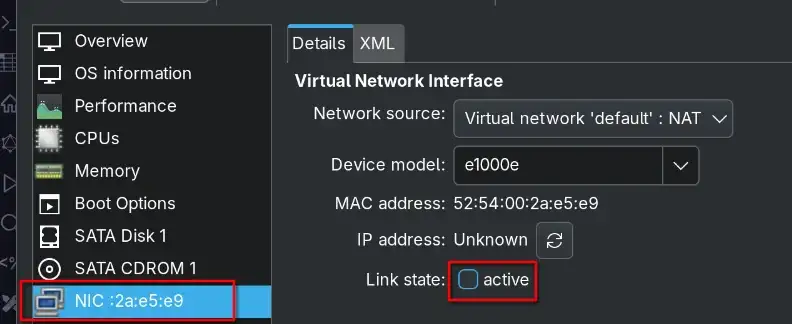
Ensure virtual machine NIC Link state is not checked using Virtual Machine Manager.
Remember to click Apply.
Mount virt-win.iso on the CDROM, install the Virtio tools, and dismount the ISO
The ISO virt-win.iso contains the Virtio drivers for Windows that facilitates communication between the guest and host. It offers the usual things such as:
- Copy and paste between host and guest.
- Time synchronization.
- Shared folders.
Using Fedora 41, the package is called virtio-win and is installed like any other package. After installation of the package, the ISO file is placed in /usr/share/virtio-win and a symlink called virtio-win.iso is created pointing to the latest ISO version.
ls /usr/share/virtio-win -l
total 709480
drwxr-xr-x. 1 root root        46 Feb  1 15:16 drivers
drwxr-xr-x. 1 root root        68 Apr 13 15:31 guest-agent
drwxr-xr-x. 1 root root       136 Apr 13 15:31 installer
-rw-r--r--. 1 qemu qemu 726501376 Apr  7 01:00 virtio-win-0.1.271.iso
lrwxrwxrwx. 1 root root        22 Apr  7 01:00 virtio-win.iso -> virtio-win-0.1.271.iso
To mount the ISO, click CDROM and then Browse, find the ISO file, click Choose Volume and click Apply:
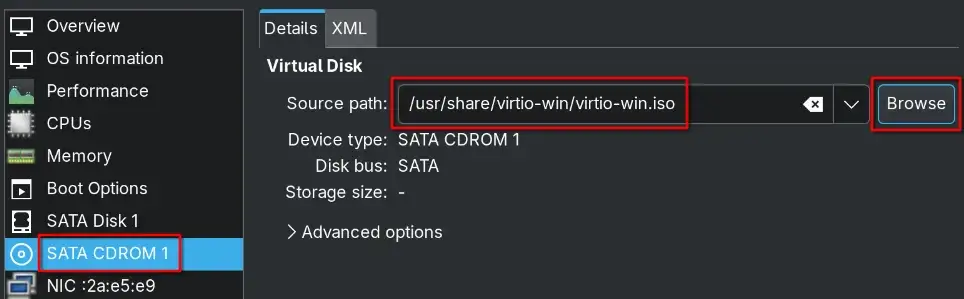
Virtual machine CDROM is mounted with the virtio-win.iso file in Virtual Machine Manager.
In the virtual machine, open Explorer, navigate to the CDROM, and run virtio-win-guest-tools.exe and complete the setup:
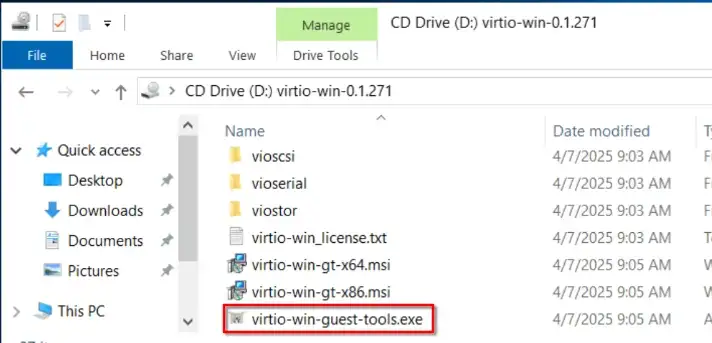
Navigate to the CDROM and run virtio-win-guest-tools.exe in the virtual machine.
Once the installation is complete, dismount the CDROM by removing the filename and click Apply:
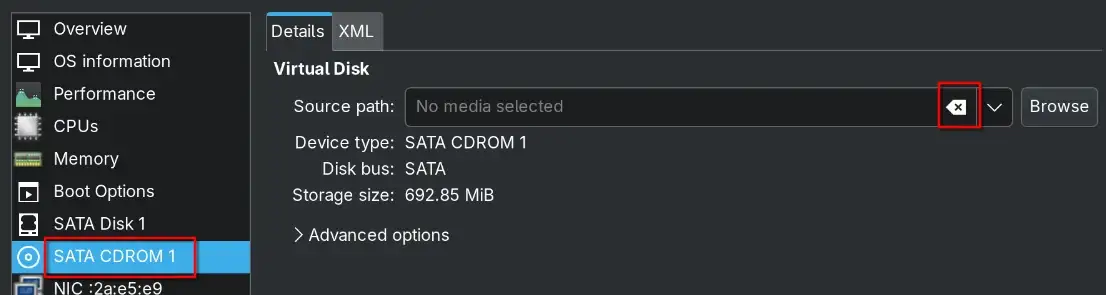
Virtual machine CDROM is dismounted by removing the filename in Virtual Machine Manager.
Set Windows Updates to notify only
Once the Virtio tools are installed, you can copy and paste code over to the virtual machine.
Windows has a habit of checking for updates as soon as it is started, and that is really helpful if you’re using a computer that will be around for a while. Most Windows virtual machines I run are short-lived, and I don’t need resources being used in detecting, downloading installing updates. So I set them to notify only with this PowerShell code (run in an elevated session):
New-Item -Path 'HKLM:\SOFTWARE\Policies\Microsoft\Windows\WindowsUpdate\AU' -ErrorAction SilentlyContinue -Force
New-ItemProperty 'HKLM:\SOFTWARE\Policies\Microsoft\Windows\WindowsUpdate\AU' -Name 'AUOptions' -PropertyType DWORD -Value 2 -Force
Enable the NIC
See disable the NIC but ensure the Link state box is checked. Windows Updates will check for available updates, and notify you they are available, but not download them.
Enable File Sharing Between the Guest and the Host
This is called Shared Folders by most hypervisors and allows you to share files and folders from the host, to the guest. To configure this in KVM, you have to make two changes to the virtual machine hardware details in Virtual Machine Manager.
The first change you need to make is to enable Shared Memory as that is a requirement to add a shared Filesystem, which is our end goal.
Under Memory ensure Shared Memory is ticked and click Apply:
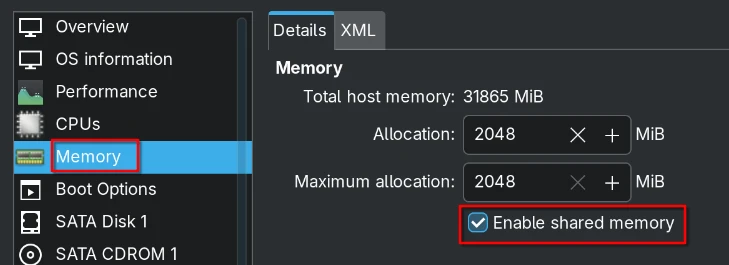
Enable Shared Memory, under the Memory option in Virtual Machine Manager.
At the bottom of the list of virtual machine hardware, click Add Hardware and select Filesystem and enter the details:
- Driver:
virtiofs(this is the default). - Source path: Enter the path, or click Browse, to add the path, from the host, that you want to share to the guest. I generally just share my home folder.
- Target path: This is the name of the mapped drive, that will appear in the Windows guest.
Click Apply. You will see a message that this setting will apply the next time the virtual machine starts. Note that this is not a reboot of the virtual machine, but a shutdown and startup of the virtual machine. But don’t shut it down just yet.
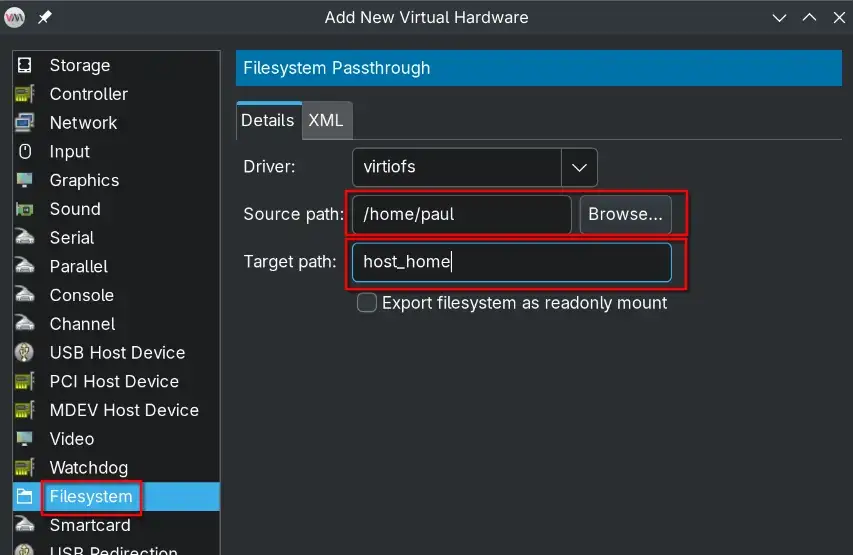
Add a shared Filesystem in Virtual Machine Manager.
To use the files and folders shared from the host, we need to install the Windows File System Proxy (WinFsp) software on the guest virtual machine. There is a Chocolatey package to do this. However, I want to ensure my virtual machines have the absolute minimum of changes made to them, so we will be using the installer directly and running it from PowerShell:
# Download the latest beta version. Latest stable is at https://github.com/winfsp/winfsp/releases/download/v2.0/winfsp-2.0.23075.msi
$winfspPath = Join-Path -Path $HOME -ChildPath 'Downloads\winfsp.msi'
# Download the file to Downloads\winfsp.msi.
Invoke-WebRequest -Uri https://github.com/winfsp/winfsp/releases/download/v2.1B2/winfsp-2.1.24255.msi -UseBasicParsing -OutFile $winfspPath
# Install the software
msiexec /i $winfspPath /qb /norestart INSTALLLEVEL=1000
# Set the service to automatically start.
Get-Service virtiofssvc | Set-Service -StartupType Automatic -PassThru | Start-Service
# Remove the downloaded installer
Remove-Item -Path $winfspPath
Once that installation is complete, you need to shut down the guest virtual machine for the new Filesystem hardware to be active. Once the virtual machine is back up again, you can see the shared folder in Windows Explorer:
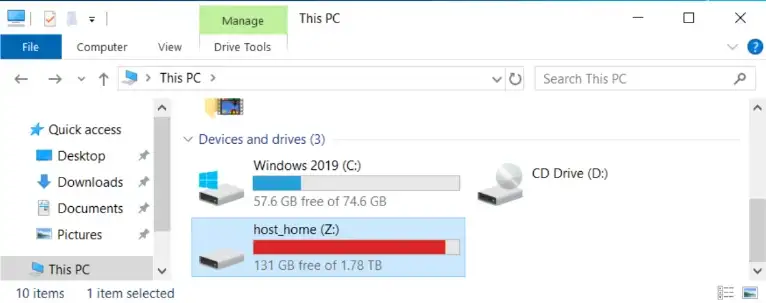
See the host shared folder, in the Windows guest virtual machine, using Windows Explorer.
Shutdown and Snapshot
This is just something I tend to do to ensure I can always roll back to a baseline of when the guest operating system was built. If you have shutdown the virtual machine in the last step, you don’t need to do that again. You can take a snapshot of the virtual machine while it is running.
Summary
There are a few steps in this process, but once you’ve achieved muscle memory for the tasks, it takes no more than 5 minutes to do. And if you take a snapshot of your virtual machine, it’s a one-off task you don’t have to do again for that virtual machine.
Once these steps are complete it makes working in Windows guests, under Linux, just as smooth as it did under VirtualBox, Hyper-V and VMware Workstation (yes, I’ve used all three). At the moment I use a mixture of Windows client and server virtual machines, alongside a Chocolatey Test Environment virtual machine multiple times each week without issue.
I’m interested to know what you use when configuring Windows virtual machine guests? Have I missed any steps? Let me know in the comments below.
