How To Use Hyper-V, VirtualBox and VMware With Multiple Boot Entries
Using a cross-platform virtualisation technology for the Chocolatey team has always been important. But as a team who all use Apple Mac’s it became particularly important when I started sharing virtual environments with them. I use Windows 10. They all use OSX. So we decided to use VirtualBox which had the added advantage of having good Vagrant support, which was used extensively internally.
Running Docker with VirtualBox requires a bit of fiddling. Fortunately Stefan Scherer has put together an awesome solution to do just that but VirtualBox is just flaky at times. Add into the mix the unpredictable nature of Vagrant and running this mix-up of technologies can be a frustrating experience!
So to give me the ability to run Docker natively and to still use Vagrant I need to enable Hyper-V. But I still want the ability to use VirtualBox as needed. The solution is to have a choice at bootup - Hyper-V or no Hyper-V. When you mention dual booting or bootup choices it usually involves some sort of choice where the result of it going wrong is not being able to boot! This isn’t one of those.
The steps to doing this are fairly straightforward:
Ensure you have no running VirtualBox virtual machines running and close it down. If you have had any running, I’d actually reboot before continuing. I have nothing to say that this is needed or you’ll end yup with issues if you don’t, but it’s good practice for this;
Install Hyper-V either using Chocolatey
choco install Microsoft-Hyper-V-All -source windowsFeaturesor PowerShellEnable-WindowsOptionalFeature -FeatureName Microsoft-Hyper-V-All -Online -NoRestart(note that if you are going to run this in PowerShell it must be in Windows PowerShell - the cmdlet does not exist in PowerShell Core);We are going to create the boot entry for running Hyper-V:
Make a copy the current boot options so we have the same bootup, but with / without Hyper-V. Run (note that the single quotes around the
{}is important if you are running this from the PowerShell console):PS> bcdedit /copy '{current}' /d "Windows 10 Hyper-V" The entry was successfully copied to {47ee463b-3af8-11e9-9247-8cec4b29743c}In the output of the above command note the ID inside the
{}. We will need this shortly.We are going to enable Hyper-V to run for this new boot entry. Run the below replacing
<CREATED ID>with the ID noted in the last step:PS> bcdedit /set '{<CREATED ID>}' hypervisorlaunchtype auto The operation completed successfully.Finally we are going to turn Hyper-V off for our current boot entry and change the description. Run:
PS> bcdedit /set '{current}' hypervisorlaunchtype auto
The operation completed successfully.

PS> bcdedit /set '{current}' description "Windows 10 VirtualBox"
The operation completed successfully.
If you want to make your current boot entry run with Hyper-V and the new entry work with VirtualBox then adjust the commands above accordingly.
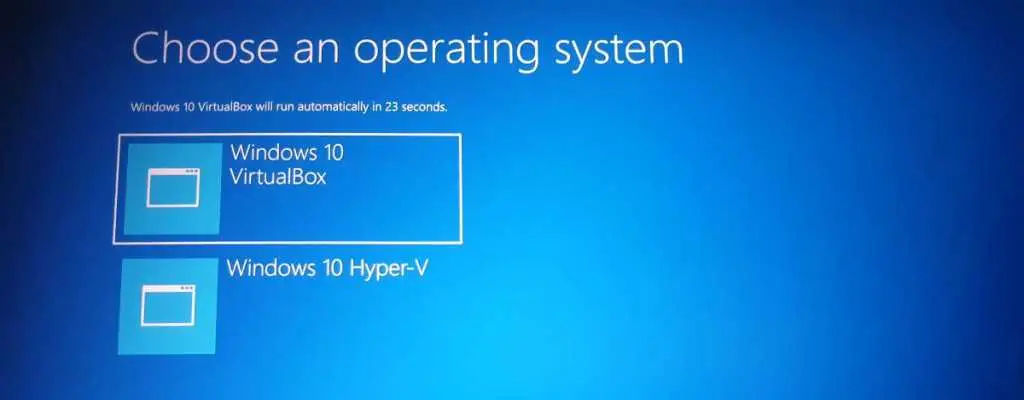
Now when you boot up you will get two boot options:

Choose the entry you need and continue to boot!
Going forward I hope this gives me the best of both worlds. I am expecting some resistance from Vagrant as Hyper-V doesn’t give it everything it needs to be happy, but only time will tell if I can live with it. Worst case I can still run Docker natively, as intended!
